Year: 2024
- Erin Walker
- 18 Mar 2025
How Long Does It Take to Install 50 Sqft of Wood Floor? Timeline & Tips!

How Long Does It Take to Install 50 Sqft of Wood Floor? Thinking about adding wood flooring to a tiny space, say 50 square feet? You might question the duration. Fitting hardwood floors in a minuscule room, a narrow corridor, or even a closet, can take different amounts of time. This is due to several things like the wood’s kind, your subfloor’s status, and if you’re getting a pro onboard or planning a DIY project. In this post, we aim to clear up your main concern and offer further details on speeding up or delaying installation, like adapting to temperature changes, assessing your subfloor, and so on. General Timeline for Installing 50 Sqft of Wood Flooring If you are working with a professional, you can usually expect the installation process for an area as small as 50 square feet to take half a day to one entire day. This is a summary of what usually entails: Acclimation of Wood Flooring: 3-7 days (for solid hardwood) Subfloor Preparation: 1-2 hours Flooring Installation: 2-4 hours Finishing Touches (if necessary): 1-2 hours Therefore, while the actual installation of the flooring can take only a few hours, the overall timeline for completing a 50 sqft project, including acclimation and any potential subfloor preparation, can take 3-7 days. Key Factors That Influence Installation Time Even with a small area like 50 square feet, several variables will determine the exact time it takes to install hardwood flooring: 1. Type of Wood Flooring The type of wood you choose will significantly affect installation time. Pre-finished Wood Flooring: Wood that’s already finished is prepared for immediate installation, as it comes coated with the needed finish. So, you can ditch the hassle of on-site sanding, staining, or sealing. This makes it quicker to install than unfinished hardwood, which means your 50 sqft project will be done faster! Unfinished Wood Flooring: Selecting unfinished hardwood makes your task lengthier. There’s sanding, staining, and polishing to consider. Adding these in, you’re looking at a few more hours on your schedule. It could take from 2 to 3 hours extra or even longer. It all hangs on things like the current moisture in the air and the kind of wood you picked. 2. Subfloor Condition It’s important how your subfloor looks. A clean, dry, and flat subfloor means things will go fast. But, if it’s not flat, has damage, or needs more work, like a moisture shield or leveling compound, it will add 1-2 hours or more to the job. Make sure to inspect the subfloor thoroughly before installation begins to avoid any unexpected delays. 3. Installer Experience Getting pros to do the job? Their abilities and knowledge play a role in the timeframe. A pro floor fitter might manage a 50 sqft spot in 2-4 hours. But go DIY and the timeframe changes. Without experience, you may need more time. 4. Space Layout and Obstacles The space’s design and hurdles can influence the installation time. An uncluttered, open area makes the job faster. But things like cabinets, fireplaces, or anything else in the path will need extra time. Extra time goes to measuring, trimming, and adjusting. These problems may add an extra 2-3 hours or more. Planning to use a unique design (like herringbone or parquet) also makes things slower. It could make the job take 2-3 times longer than usual. Installation Steps for 50 Sqft of Wood Flooring Now let’s break down the typical steps involved in installing 50 sqft of wood flooring: 1. Acclimating the Wood Before putting down wood flooring, let it adjust to your home’s temperature and dampness. This stops the wood from bending or getting smaller after you’ve installed it. Normally, solid hardwood takes 3-7 days to adjust. But, engineered wood flooring gets used to things quicker – usually within 1-2 days. It’s important to ensure that the humidity level inside the home remains consistent (30-50%) during this time, and the room temperature should stay between 60°F and 80°F (15°C to 26°C). 2. Preparing the Subfloor When the wood’s ready, we deal with the subfloor next. Clean it up, watch for damp spots, even it out if needed. A good floor only needs an hour or two. But, if we have to fix stuff, it might take more time. 3. Installing the Flooring For a small space like 50 sqft, professional installers can usually complete the actual installation in 2-4 hours, especially if there are no complex cuts or patterns involved. The installers will measure and cut the boards to fit the space, ensuring that each plank is laid properly. 4. Finishing Touches (Optional) For raw wood, you have to add extras like stains, seals, and layers of polyurethane. This adds 1-2 hours and the floor needs dry-time. With already finished wood, no need for this step. Your floor’s set to use right away. Additional Considerations That Affect the Timeline While a 50 sqft flooring project may seem straightforward, there are a few factors that can add extra time to the installation process: 1. Humidity and Weather Conditions Wood flooring’s time to settle and dry after fitting is influenced by humidity. In places with lots of humidity, the damp air can slow down the settling period and the drying of finishes. Living in such a humid place may tack on an extra couple of days to the whole process. 2. Complex Layouts or Patterns If you choose a complex layout such as herringbone, parquet, or another intricate pattern, it will require more time for the installer to cut, measure, and lay the flooring. This can increase installation time by 2-3 times compared to a simple, straight-lay installation. 3. Subfloor Issues Sometimes, issues with the subfloor are discovered only during the preparation stage. Uneven floors or moisture problems can delay the project by 1-2 days. It’s essential to have your subfloor inspected beforehand to avoid surprises. How Long Does It Take to Install Hardwood Flooring? For a typical hardwood flooring installation (not limited to 50 sqft), the
- Erin Walker
- 18 Mar 2025
Fort Lewis Housing Floor Plan Greenwood: A Historic and Welcoming Community!
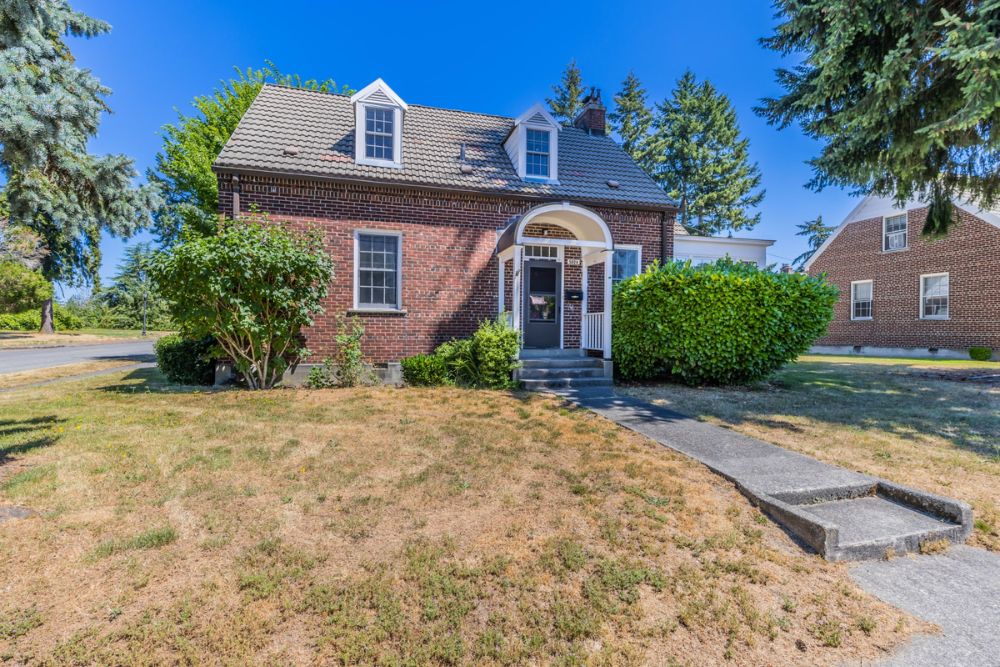
Fort Lewis Housing Floor Plan Greenwood: Joint Base Lewis-McChord (JBLM) in Washington State houses Greenwood. Azure blends history and now in this appealing locale. Military families want to live here. This diverse area meets every need. You can select a standard family house, duplex or neat apartment. Greenwood is versatile. We aim to discuss housing picks, layout schemes, facilities, and key factors about living in Greenwood in this blog post. Fort Lewis Housing: Greenwood – A Historic and Welcoming Community Greenwood is a historic area. Many houses there were built in the 1900s. Greenwood is part of JBLM. The houses combine old architecture and new conveniences. Greenwood is more than a living place. It’s a supportive place for military families. It’s close to base facilities, schools, and other services. Greenwood has a strong community feeling. It’s a place for families. Residents can enjoy modern comforts and appreciate the area’s history. If you’re thinking about living in Greenwood, you should know about the different house types, floor plans, and amenities. This information can help you decide. Housing Types in Greenwood Greenwood provides a variety of housing types to cater to the diverse needs of military families. These include single-family homes, duplexes, and apartment-style units, each offering distinct features and benefits. Single-Family Homes In Greenwood, a lot of people prefer traditional single-family homes. They’re old, but that’s what gives them charm. Original hardwood floors, tall ceilings, and classic appearances are typical. These homes have big yards. Great for families with kids, pets, or just a love for being outdoors. The space within these homes can differ, but they’re mostly spacious. Multiple bedrooms and bathrooms cater to bigger families. Some homes even have a basement or an attic. This means extra room for storing things or living. Duplexes If you don’t need a large place, but want enough room, the Greenwood duplexes are perfect. These two-story homes split into two separate areas. Each part has everything needed for a comfy life. Duplexes give a cozy place to live. They’re close to community spots and key necessities. Duplexes, may have less outside space than single homes, they still have a mixture of privacy and ease. Lots of duplexes in Greenwood have up-to-date insides, new appliances and big living spaces. Apartments Those in search of smaller, manageable living quarters will find Greenwood’s flat-style homes a fitting choice. They usually come in one, two, or three-bedroom versions, making them great for folks not requiring the extensive area a house provides, yet still desiring local facilities and the area’s historical allure. Flats often have a smaller footprint, flaunting a modern design often with open living spaces. They’re an excellent pick for people on short-term duty at JBLM or anyone leaning towards an easy-going lifestyle. Floor Plan Variations in Greenwood The floor plans in Greenwood housing can vary depending on the type of home and the era in which it was built. However, there are a few key features that are common across many of the homes in the community. Classic Layout Greenwood’s old-school houses usually have a unique and classic design. These homes separate the living, dining, and kitchen zones, each having a specific purpose. Bedrooms generally are upstairs or off to one side, offering a calm, private area for rest. Families who like the old-fashioned setup with separate spaces will love this. It allows entertaining in communal areas like the living or dining rooms, whilst still having private family spaces in the bedrooms. Open-Concept Design Modern homes in Greenwood may feature an open-concept floor plan, which blends the living, dining, and kitchen areas into one large, flowing space. This design promotes a sense of openness and allows for easy interaction between family members, whether you’re cooking, eating, or relaxing. Open-concept homes are perfect for families who enjoy a more modern, casual living style and often make the best use of available space. Flexible Spaces Greenwood houses offer spaces that can change as needed. This could be a workroom, a kids’ play area, or an extra room for guests. These switching spaces make it simple to shape your home to your family’s way of life. In a place where military tasks move regularly, having a home with flexible room is a big plus. It lets families change their living settings fast to meet their unique needs. This could be more storage or a peaceful spot for studying or work. Amenities and Features in Greenwood Homes Greenwood homes are equipped with a variety of modern amenities to ensure comfort and convenience. From updated appliances to community recreational facilities, these homes offer everything you need for daily living. Modern Appliances Greenwood houses come with all sorts of current kitchen gear, like ovens, fridges, even dishwashers. This top-notch equipment makes your cooking and tidy up tasks quick, letting you focus elsewhere. A lot of houses include other stuff, like microwaves, trash crushers – super handy! Washer and Dryer In-unit washer and dryer facilities are a standard feature in Greenwood homes, providing residents with the convenience of doing laundry from the comfort of their own home. This eliminates the need for trips to a laundromat and allows for easy maintenance of household laundry. Climate Control Greenwood houses are equipped with central heat and AC, a feature that strives to keep you cozy all year round. Washington’s weather cycles through cold Winters to hot Summers, that’s why home climate control is such an advantage. Spacious Storage All homes in Greenwood value storage. From big closets to cupboards, basements, or attics, space is no issue. Particularly families in the military find it handy. Things like seasonal possessions, spare furniture, or vital records have ample room. Outdoor Space Most homes in Greenwood feature spacious outdoor areas, whether it’s a large yard, a private patio, or a shared green space. These areas are ideal for outdoor activities, whether you’re enjoying a family barbecue, letting children play, or simply relaxing in the fresh air. Community Amenities Living in Greenwood not only provides good home comforts,
- Erin Walker
- 18 Mar 2025
3822 Blossom Terrace Erie PA Water Floor Plans: Hook Up Diagram, Layout and How to Turn Off Water
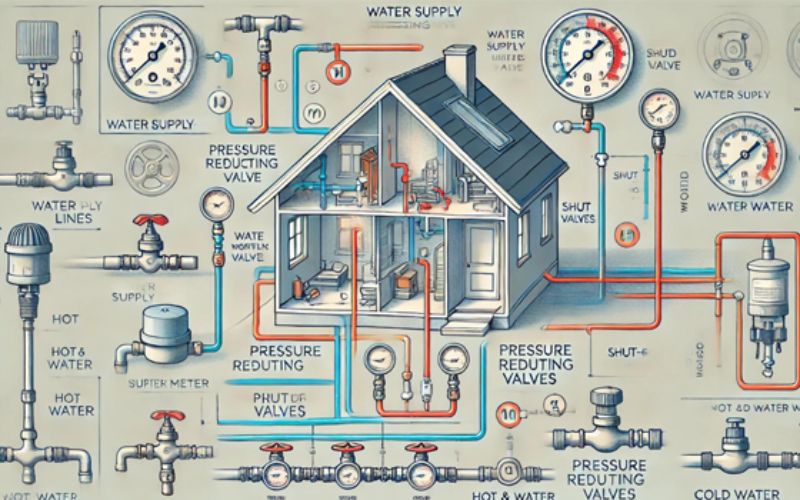
3822 Blossom Terrace Erie PA Water Floor Plans: Knowing your house’s water workings at 3822 Blossom Terrace, Erie, PA is a must for homeowners and hopeful buyers. The water connection plan is a key tool for good upkeep and fixing of your plumbing system. When you get to know the parts and design of this system, you stop expensive problems and your house runs better. This guide tells you all about the water system at 3822 Blossom Terrace. It talks about important parts, usual plumbing issues, and top tips for keeping it working well. Overview of 3822 Blossom Terrace Erie PA Floor Plans 3822 Blossom Terrace links up with Erie’s city water supply. The system involves pipes, valves, and gadgets that help water move around the house without a hitch. The water hook-up sketch shows this intricate web, letting homeowners see how water comes in and spreads out inside the home. This sketch isn’t just a technical drawing; it’s a handy tool for handling your home’s plumbing efficiently. All water that reaches your house comes through the main water supply line. The pipe needs to be sturdy to do this job. It can be made from things like copper or PEX. This pipe moves treated water from the town’s source into your house’s plumbing. Next to where the water comes in, there’s a main shut-off valve. This is really important. It stops water from moving when you need to fix something or during an emergency. If you know where it is, you can avoid big water messes if a pipe leaks or bursts. Plumbing Layout of 3822 Blossom Terrace Erie PA Water Floor Plans Water gets into your house through a large pipe and splits off into smaller ones. These spread water all over the house. A diagram shows this, mapping out how cold and hot water get to different places. Cold water goes straight from the main pipe to important spots like sinks, toilets or outside taps. Hot water goes a different way though. First, it warms up in your water heater before it fills up your showers, dishwashers, and washing machines with hot water. Understanding the internal plumbing layout is crucial for homeowners or contractors when addressing plumbing issues. For instance, if a leak occurs, knowing the location and route of each pipe allows for quick identification of the problem area, thereby minimizing damage and repair time. 3822 Blossom Terrace Erie PA Water Hook Up Diagram A do-it-yourself plumbing guide shows some vital parts. Easy-to-reach stop valves matter a lot. Homeowners can manage where water goes in their house. The guide points out many strategic valves. One big master valve controls all the water. There are tiny local valves near fixtures too. If a single fixture needs a fix, just shut off its local valve. The rest of the house still gets water. This handy feature aids everyday upkeeps. In the image, you see a vital piece called a pressure regulator. It keeps the water pressure coming into your house at a safe level. Too much pressure may hurt pipes and machines, leading to pricey repairs. Plus, there’s a handy tool called a backflow preventer. This tool makes certain that water only goes one way, stopping dirty water from mixing with your clean water. This is super important for houses with outside watering systems or hose hook-ups. Common Plumbing Problems Homeowners at 3822 Blossom Terrace may encounter various plumbing issues related to their water hook-up system. Being aware of these common problems can facilitate quicker resolutions. Low water pressure is a frequent complaint, often stemming from partially closed valves or clogs in the pipes. Regular inspection of aerators and flushing out sediment buildup can help maintain optimal water pressure. Water supply suddenly gone? Here’s what to do. Start by checking your main shut-off valve, make sure it’s open. If it is, and you still have no water, ask your local authorities. They’ll know if there’s a service disruption. Worried about leaks? They can lead to water waste and might damage your property. To catch them early, keep an eye on your pipes and fixtures. Seen a leak? Repair it pronto! 3822 Blossom Terrace Erie PA How to Turn Off Water At 3822 Blossom Terrace, Erie, PA, shutting off the water isn’t hard. Find the main cut-off valve: in the cellar, utility corner, near the heater, in little rooms, or crawlspaces. No basement? Look outdoor near the street. It’s in the water meter box, perhaps needing a key to unlock. Found it? Twist a gate valve right, or flip a ball valve 90 degrees to match the pipe. Check by using a tap to ensure no water flows. Can’t find it or need assistance? Erie Water Works can help. They have unique tools for the outer curb valve. 3822 Blossom Terrace Erie PA Water Cut Opffs At 3822 Blossom Terrace, Erie, PA, you might want to know how to turn the water off. The first step? Find the main water cut-off valve. In most Erie homes, you can find this near the water meter. This might be in the basement, crawl space, or a utility room. Knowing this place is key. It stops water damage if there’s a leak or an emergency. To turn off water in a specific area, look for individual valves under sinks, behind toilets, or near water-based devices like heaters or washing machines. If the valve’s stiff, feel free to use a wrench or smoothen it using some lubricant. Run into problems or can’t find the valve? You might need to call a professional plumber. Maintenance Tips for Homeowners Looking after your water system regularly helps keep it running longer and better. House owners should make a habit of searching for leaks. How? Check the pipes and fixtures you can see. Look for water or rust. Another good step is to keep an eye on the water meter. Funny numbers could mean unseen leaks or other problems. Also, keep a close look at the pressure
- Erin Walker
- 18 Mar 2025
Understanding the Price of a Wooden Electric Pole Replacement: Let’s Check All Factors!

The Price of a Wooden Electric Pole Replacement: Fixing electrical structures often means changing out old wooden power poles. The lifespan of these poles is not set in stone. It can change based on weather, care, and treatment. Knowing what it costs to replace a wooden power pole is key. In this write-up, we’ll explain the different things that can change the cost of replacement. We aim to give a full picture to help you decide wisely. Factors Influencing the Cost of Wooden Electric Pole Replacement 1. Type of Wooden Pole The type of wooden pole you choose significantly impacts the overall cost of replacement. There are various options available, including: Species of Wood: There are a bunch of wood types out there. Some are durable, some are affordable, and some are easy to find. Take cedar, pine, and Douglas fir, for instance. Cedar’s great because bugs and rot don’t bother it. However, it can be pricier than pine. Treatment: Poles treated with preservatives, or pressure-treated, often have a higher initial cost. But, in the end, they’re worth it. How? They don’t need replacing as often. This fact saves you money over time. Plus, the kind of treatment they get can play a part in how long they last and their price. Height and Diameter: The specifications of the pole also play a crucial role. Taller and thicker poles require more material and labor to install, which directly impacts the cost. Choosing the right type of pole is essential for balancing upfront costs with long-term durability and maintenance requirements. Consulting with a professional can help you determine the best option for your specific needs. 2. Labor Costs Labor costs can vary widely based on several factors, including: Location: Depending on where you live, labor rates may be very different. People who live in rural areas, where the cost of living is lower, often have to pay more for labor in cities. Skill Level: Swapping out electric poles takes some know-how. You may need to hire trained workers. Even though electricians or contractors who have specialized knowledge might cost a bit more, their familiarity with the task means they can get it done right, and without any danger. Time Required: The job’s difficulty can affect the work’s cost. If the pole is in a tricky spot or if issues like nearby utilities arise, the task could take more time. This would raise the cost of labor. Grasping the concept of labor expenses is key for properly planning your project budget. By gathering various estimates from different contractors, you have the chance to discover a fair price, but also ensure good craftsmanship. 3. Additional Equipment and Materials In addition to the wooden pole itself and labor, several other materials and equipment may contribute to the overall cost: Hardware: Securing the new pole usually calls for new bolts, brackets, and similar items. Even though they’re tiny, their costs can start to build if you’re swapping out several poles. Transportation: If the replacement involves transporting new poles to a remote location, transportation fees can significantly increase the total cost. Safety Equipment: If the pole is tall or if local rules say so, workers might need special safety stuff. That could mean harnesses, ladders, or bucket trucks, and those all add to the cost of the project. Extra expenses can often get ignored. However, they are critical to fully grasp the overall investment needed for pole replacement. When budgeting, always consider these factors. 4. Permits and Regulations Before replacing a wooden electric pole, it’s crucial to be aware of local regulations and permit requirements, which can affect costs: Permitting Fees: Many jurisdictions require permits for replacing electrical infrastructure. The fees for these permits can vary and should be included in your budget. Inspection Costs: Once you’ve installed it, some places require checks. They want to make sure you’re following local rules and keeping things safe. These checks might mean more costs. Utility Company Requirements: Your place determines the rules for changing poles. Utilities may need certain materials, methods, or checks before installation. If you don’t think about these regulatory costs, you might have to pay extra money during the replacement process. Before you start any project, you should talk to the local government or your utility company. 5. Total Cost Estimates When looking at all the factors, the overall price to swap out a wooden electricity pole fluctuates a lot. Homeowners could potentially be shelling out $1,500 to $3,000 for just one pole substitution. It’s a ballpark figure, consisting of the pole’s expense, manual work, and needed materials. Basic Replacement: For a straightforward replacement in an accessible area with minimal complications, costs may be on the lower end of the spectrum. Complex Scenarios: If the pole is in a challenging location or if multiple poles need replacing, the price can easily escalate. Additionally, using premium materials or specialized services will drive costs higher. It’s always a good idea to obtain multiple quotes from contractors and consider all the factors discussed to get a more accurate estimate tailored to your specific situation. Conclusion Switching out a wood electric pole takes on many expenses. This involves the pole kind, work, extra stuff, and legal charges. Knowing these aspects can help homeowners make smart choices that fit their money plan and wants. Always think about getting expert recommendations and various cost estimates to have a successful and affordable pole swap job. Spending money on good quality materials and capable workers assures safety and trustworthiness. It can even lengthen the life of your electric setup, giving you calmness for many years ahead.
- Erin Walker
- 18 Mar 2025
40×60 Barndominium Floor Plans with Shop: A Versatile Living and Working Space
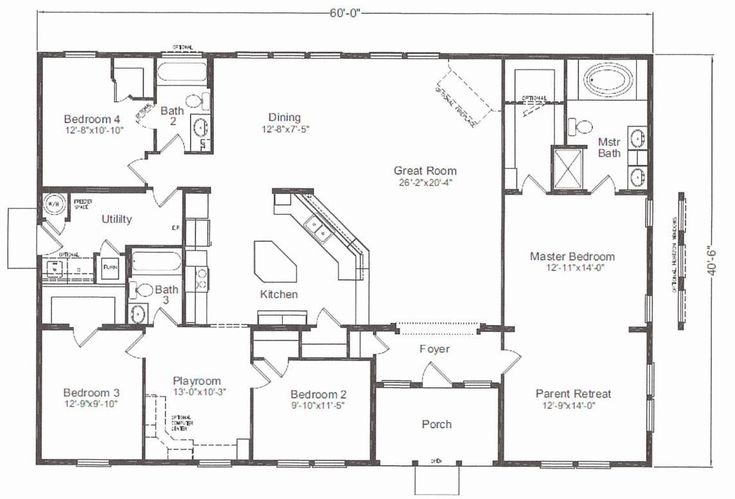
40×60 Barndominium Floor Plans with Shop: As a 40×60 barndominium has enough space for both a cozy home and a useful shop, it’s the right combination of homes and shops. These buildings are becoming more and more popular because they are flexible, cheap, and good at what they do. This piece will talk about common floor plan layouts, important things to think about when designing your space, and more ways to make your living space and office more efficient. Why Choose a 40×60 Barndominium with Shop? With the practicality of a workshop paired with a rustic yet modern living space, barndominiums have seen a sharp increase in popularity. A 40×60 barndominium has around 2,400 square feet, which is sufficient for a sizable, useful workshop in addition to pleasant living. Benefits of a 40×60 Barndominium: Cost-effective: Metal construction is typically more affordable and faster to build than traditional homes. Customizable: The large open floor plan allows for endless interior customization. Dual-purpose space: Provides a seamless transition between living space and a shop for hobbies, business, or storage. Popular 40×60 Barndominium Floor Plan Layouts with Shop Open-Concept Living with Attached Shop This well-liked design has an attached shop for convenient access between work and home, as well as a spacious, open living area. Usually taking up one-third of the building, the retail section leaves ample space for an open-concept eating and living area. For people who appreciate the ease of having a direct connection between their home and workplace, this design is ideal. Living Area Features: Open floor plan with high ceilings. 3-4 bedrooms with a master suite. Spacious kitchen with a large island. Living room and dining area ideal for family gatherings. Shop Features: 20×40 feet shop space attached to the house. Garage door for easy access to vehicles and equipment. Can be used for workshops, storage, or even a home business. Split-Level Design with Shop Because the store is located on a different floor than the main living area, this plan provides greater privacy and keeps workstations apart from living areas. Those who want a more tranquil setting and wish to keep work and home life apart may find tremendous satisfaction in this style. Living Area Features: The top level’s primary living area consists of an open-concept kitchen and living room, a master bedroom, and many other rooms. Excellent for families that want seclusion between the workshop and the bedrooms. Shop Features: Located on the lower level or separate structure. Can be used as a workspace, garage, or for storage. Perfect for those who need a quieter workspace away from living quarters. Ranch-Style Barndominium with Separate Shop A ranch-style barndominium with a shop offers a classic house feel with a single-story living area and a store that can be connected or separate. Those who like traditional single-story houses with convenient access to their workstation may find attraction in this design. Living Area Features: Single-story layout with 2-3 bedrooms. Spacious kitchen and living room. Home office and mudroom are common add-ons. Shop Features: The shop can be detached from the house, providing flexibility in use. Can be customized to include a separate office space, storage, or garage. Key Considerations When Designing a 40×60 Barndominium with Shop Shop Size and Purpose The size and purpose of the store should be carefully considered before choosing a floor layout. Will it be a place to work on hobbies, store cars, or keep large equipment? Make sure the shop area is planned to accommodate workbenches, storage racks, and convenient access for any cars or equipment. Living Space Layout Adapt the living space to the demands of your household. Think about the amount of bedrooms, how the kitchen and other common areas are laid up, and extras like home offices or pantry storage. Comfort and functionality will be maximized with a well-thought-out floor layout. Storage Solutions There should be enough of storage space in both the living area and the store. Include pantries in the kitchen, closet space in the bedrooms, and overhead tool and equipment storage in the shop. Energy Efficiency Because barndominiums are frequently composed of metal, you need think about insulating the living area as well as the shop to make sure they use less energy. This will save utility expenditures in addition to aiding in temperature management. Local Building Codes and Zoning Regulations Before you finish your plan, make sure it follows the rules for building and zoning in your area. Even though barndominiums are open, there may be rules that apply to your land, so it’s important to check with the local government. Additional Tips for Optimizing Your 40×60 Barndominium Proper Ventilation If you’re going to work with materials that give off dust or fumes, make sure your shop has enough air flow. Good airflow not only makes sure that your workspace is comfy, but it also keeps the air safe and clean. Insulate the Shop Put in the right padding to keep your shop area at the right temperature. At the same time, this will help keep energy costs low and make the office more comfy in both summer and winter. Electrical Outlets and Lighting Set up enough electricity outlets in the shop so that tools, machines, and other items can be charged. It’s also important to have good lighting, especially if you want to work at night. Cost Estimation for a 40×60 Barndominium with Shop The cost of building a 40×60 barndominium depends on where it is located, the materials used, and the work that is needed. A basic shell usually costs $50 per square foot, which means that a 2,400-square-foot building could cost anywhere from $120,000 to $150,000 all together. But if you add on electricity work, plumbing, finishing the inside, and making changes to the shop, the total can go up to $240,000 to $360,000. Online Resources and Tools for Planning Your 40×60 Barndominium Barndominium Plans: Explore customizable floor plans at The Barndominium Co. Pinterest: Search for “40×60 barndominium floor plans with shop” to gather inspiration
- Erin Walker
- 18 Mar 2025
Black House With Wood Accents Over the Garage Door: A Modern Aesthetic
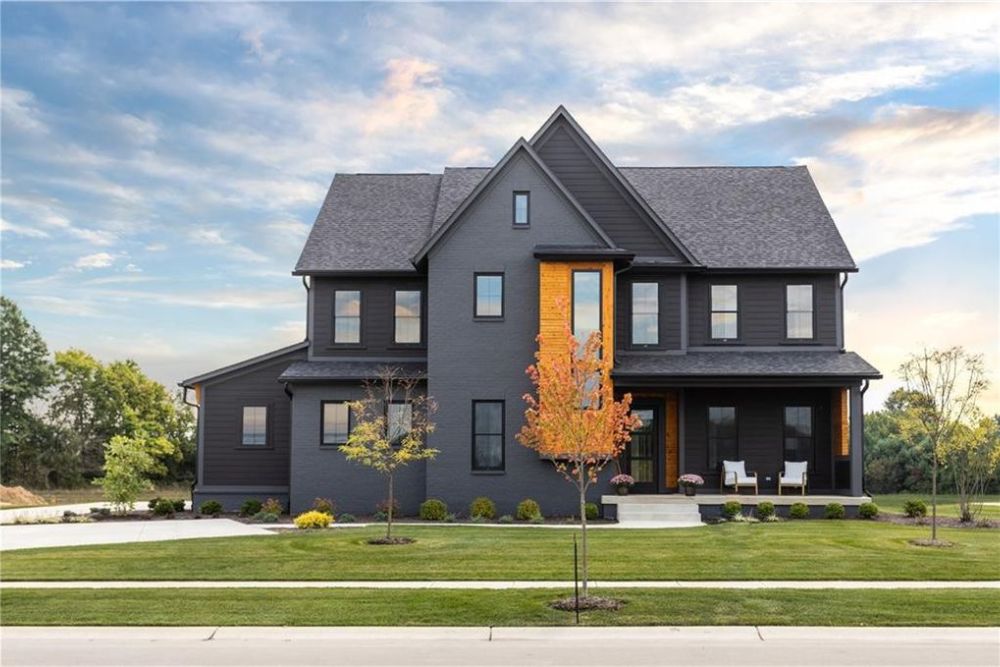
Black House With Wood Accents Over the Garage Door: More people are finding black houses appealing, with architects taking note too. They have a cool and intriguing mix of style. Wood details add a cozy feel, and the result is a modern but comforting design. This blog post looks at black houses that feature wood parts. It talks about key design ideas, practical points, and ways to get this eye-catching style at your own place. Choosing the Right Black Hue Understanding Undertones Choosing the right black is key to a balanced outside look. Different undertones – like blue, green, or gray – are hidden within black paint. These undertones change the paint’s appearance under diverse lighting. A black with a blue undertone can give a chilly, up-to-date vibe. On the other hand, a black tinged with warm gray might cast a classic feel. Considering Sunlight Exposure The amount of sunlight your home receives plays a significant role in how black paint looks on your exterior. In homes that experience limited sunlight, a darker black may create a bold statement, while a lighter shade can help reflect light, making the house appear more inviting in sunnier areas. Regional Style Matters Different places have different architectural patterns, and your house’s color should fit with the local vibe. A strong black might look fab in a trendy city zone, while a lighter black could mix well in classic areas. Always think about your house’s style and its environment when you pick. Wood Accents: Adding Warmth and Texture Front Door Charm Consider a wooden front door for your black exterior. It adds a cozy feel. Choose contrasting woods like mahogany or walnut. They can balance the black nicely. A well-made wooden door does more than just let you in. It adds a charm to your home too. Window Frames that Invite Wooden window frames can significantly enhance the inviting nature of your home. Available in various species like cedar, oak, or redwood, these frames provide a classic touch. The natural grain and texture of the wood contrast beautifully with the smoothness of the black paint, creating a harmonious balance. Natural Porches and Decks Adding a wooden porch or deck is great for bringing warmth. It becomes a welcoming middle ground between outside and your home, ideal for chill times or friendly get-togethers. Applying stain or paint to the wood so it matches the black exterior helps to tie everything together. Architectural Details Think about wooden touches in your house’s design. Try putting in wooden trims, fascia boards, or shutters. They could match your wooden door and window frames nicely. Paying attention to these details could bring everything together and make your place look even better. Design Considerations Striking Balance and Contrast A well-blended black house with wooden touches relies on balance. Overdoing wood can dull black’s boldness, underdoing it can feel plain. Strive for a balance where wood touches bring out the strong black exterior without vying for focus. Maintenance of Wood Accents It’s important to care for wood consistently to keep it looking good and lasting long. Problems like rot, bug harm, and color loss can crop up, especially in places with severe weather. To lessen these risks, opt for wood types that can resist the weather or use coatings that can brace against the elements. Lighting Effects Lighting can dramatically enhance the visual impact of a black house. Consider using carefully placed lighting fixtures to highlight your wood accents, creating an inviting ambiance during the evening. The interplay of light and shadow on a black surface can create a stunning effect, adding depth to your home’s exterior. Practical Aspects of Black Exteriors Managing Heat Absorption Remember, dark colors, like black, attract more heat than pale shades. If you’re in a warm area, think about using reflective paints or getting extra insulation for a cozy home. This gets crucial if your home, painted black, gets a lot of sun exposure. Maintenance Challenges Though black doesn’t demand much for staying fresh, it does a good job of showing off grime, grit, and nicks easier than softer colors. Consistent cleaning is key to keep your home looking spotless. Make this part of your standard home care plan, ensuring your place stays sharp. Impact on Resale Value A neatly-done layout with a black home and wooden highlights can noticeably enhance your house’s attractiveness and maybe its sell-on value. An out-of-the-ordinary outside often grabs potential buyers’ attention, more so if it merges up-to-date and time-honored aspects in a way that’s easy on the eyes. Conclusion A black house with timber touches is not just a fad, it’s a mark of taste and class. Picking the best tones of black is important. You also need to think about key design pieces and handle actual issues. With these in mind, you’ll get a stunning outside area that mirrors your individual style. The strong choice of black and wood not only lifts your home’s looks, but it also adds a charm that never goes out of style. If you’re either constructing a new house or updating an old one, the striking blend of black and wood will definitely make an unforgettable mark.
- Erin Walker
- 18 Mar 2025
Food Should be Stored at Least Which Distance From the Floor: Understanding the 6-Inch Rule!

Food Should be Stored at Least Which Distance From the Floor: Keep your grub up 6 inches from the ground – it stops nasties getting at your nosh! It lets air flow too. Why? Well, it stops muck, bugs, and gloopy stuff from ruining your food. Stashing food right helps keep our meals yummy and safe. One key rule folks forget is how high to lift food off the floor. In this blog, we’ll delve into why lofting food up to half a foot matters. We’ll cover stuff like clean habits, playing it safe, and top tips. Food Should be Stored at Least Which Distance From the Floor Food needs to be kept six inches above the floor. Why? To stop it from getting dirty and keep it cool. This space stops messes, grime, and floor germs from getting to our grub, cutting down on food sickness. Lifting food storage can also keep bugs and rodents away. They have a hard time reaching things not easy to get from the ground. Good air flow around stored food keeps the temp and dampness levels right; it stops food rot and keeps things like fruits and veggies fresh. Following this rule helps keep our storage spaces cleaner, safer, and more workable – whether we’re cooking at home, or running a big kitchen. Understanding the 6-Inch Rule A lot of people agree on the 6-inch rule when it comes to food safety. The guide says that all food should be kept at least six inches above the ground. This rule is for both home kitchens and places that serve food for money. The main goal of this rule is to lower the chance of getting dirty from spills, pests, and dirt. Leaving food on the ground can expose it to lots of nasties. Nearby spills can sneak their way to your food, and bugs and mice find it easier to reach. Follow the 6-inch up from the floor rule. Your food stays clean and safe, making your kitchen a healthier place. Moreover, this guideline is not only about hygiene but also about proper airflow. Storing food at a higher level allows for better air circulation, which can help maintain the quality of certain food items, especially perishables. This can contribute to prolonging their shelf life and ensuring that they stay fresh longer. The Risks of Improper Food Storage If we don’t store food the right way, like using the 6-inch rule, we risk problems. Dirty food may lead to sickness. This is really harmful. The Centers for Disease Control and Prevention (CDC) think around 48 million people in America get sick from dirty food every year. The signs go from tummy upset to conditions that could be fatal. It’s especially risky for kids, old folks, and those with weaker immune systems. Besides putting people’s health at risk, bad food storage can also cost businesses money. Food that has been spoiled or contaminated has to be thrown away, which wastes both the food and the money that was spent on it. In business settings, these kinds of losses can add up quickly and have a big effect on the bottom line. This is why it’s important to store food properly, like keeping it off the floor, to keep your health and your pockets healthy. Also, cross-contamination can happen when food is stored incorrectly. This is when harmful bacteria from one food item can move to another. The places where raw meat is kept are especially troublesome for this. If you store raw chicken right on the floor, for example, other foods are much more likely to get contaminated. By following the 6-inch rule, these risks can be greatly reduced, making the area where food is handled safer. Best Practices for Food Storage Adhering to the 6-inch rule is just one aspect of effective food storage. There are several best practices you can implement to ensure your food stays safe and fresh. First, make sure to use proper shelving or storage containers. Shelving units should be durable and designed for food storage. Avoid wooden shelves that can absorb moisture and harbor bacteria. Labels are key. Mark all eats with what’s inside and “use by” dates. It stops confusion and keeps food safe. Group your stuff in the fridge or pantry. Put similar items together, like raw meat on lower shelves, away from everything else, to stop bugs from spreading. Cold is important too. Keep the fridge at 40°F (4°C) or less and the freezer at 0°F (-18°C). This keeps germs away and food fresh. Always look for past-the-date goods and clean where you keep food to keep it safe and clean. Lastly, be mindful of how you store bulk items. Large bags of flour or rice should be stored off the ground to prevent moisture absorption and pest infestation. Utilize airtight containers whenever possible to prolong shelf life and protect against pests. The Role of Hygiene in Food Safety Food storage has a 6-inch rule that’s important. But cleaning matters too – you’ve got to keep your kitchen spotless. Dirty kitchens affect food safety. Regular clean-ups are key. Surfaces, equipment, and storage spots need attention. Use hot, soapy water or disinfectants for food touch spots. Don’t forget to sanitize your kitchen tools. Hand-washing also keeps bacteria at bay. Wash your hands a lot. Make sure to do it before cooking, after visiting the bathroom and after touching uncooked meat. This simple routine can help avoid food-related sickness. The key to cleanliness is dodging mix-ups in food handling. Have designated chopping blocks and tools for uncooked meat and prepped meals. This habit cuts down the possibility of nasty germs hopping from one meal ingredient to another. Plus, always wipe away any spillages or leaks in storage spots in a snap. Getting the hang of hygiene and the 6-inch rule gives a thorough method to food safety. Pooling these habits boosts safety in the food space, trimming down the risk of getting sick from food and
- Erin Walker
- 18 Mar 2025
1995 Shasta Motorhome Floor Plans: A Complete Guide of Retro RV Adventure
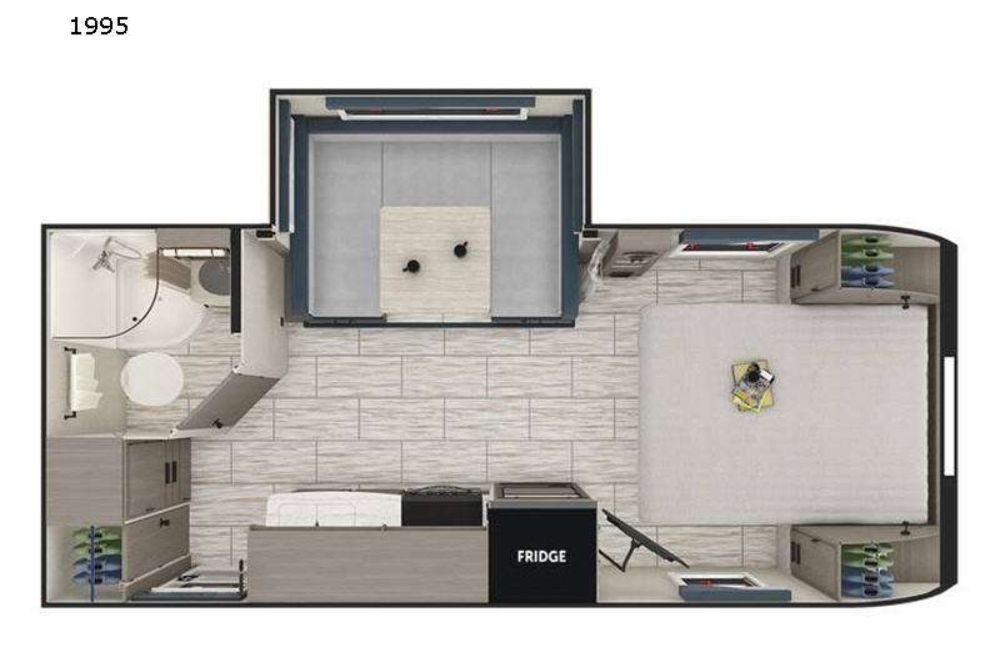
1995 Shasta Motorhome Floor Plans: A blast from the past, the 1995 Shasta Motorhome mixes old-school charm with today’s benefits. Designed to suit many campers, these RVs showcase diverse floorplans. No matter if you’re on your own or bringing a crew, Shasta has an option for you. We’ll delve into the different layouts, standout features, and how to pick the right Shasta for your journey. Popular Shasta Motorhome Floor Plans 16-Foot Model Small but mighty, the 16-foot Shasta Motorhome is just right for two or for one. It’s cleverly crafted to be snug yet workable. The petite, practical kitchen has everything you need: a stovetop, a sink, and a fridge. Ingenious planning makes the most of every inch, comfort always considered. A multi-function dinette area does double duty for eating and sleeping, great for grabbing a bite or resting during the day. The wet bath, which combines the shower and toilet into a single, space-saving unit, is one of the best things about this model. This design is great for people who want to keep their motorhome small but still have all the amenities they need. The 16-foot model has a small footprint, but it still feels warm and inviting. This makes it a great choice for people who want to explore the great outdoors without the hassle of a bigger RV. 21-Foot Model Stepping up in size, the 21-foot Shasta Motorhome offers more room for comfort and convenience. This model typically includes a larger dinette and often features a separate bedroom, which provides privacy and a more home-like atmosphere. The full bathroom in this model is a significant upgrade, offering a standard toilet and shower facilities, allowing for a more comfortable camping experience. In the kitchen, you’ve got more room to whip up meals for you or your friends. On top of that, the 21-foot Shasta has storage spaces like cabinets above and compartments beneath the bed. It’s great if you’re after a bit of extra space but still want that vintage RV vibe. This model is a hit for families or groups of pals. It gives you a mix of being small but still a comfortable place to live in. 24-Foot Model Looking for more room? The 24-foot Shasta Motorhome is a top pick. It offers a spacious living room, its own bedroom, and a complete kitchen – perfect for long journeys or family holidays. Often, it has a comfy living space, a convertible dining area for extra sleeping spots, and a full kitchen for preparing large meals. One unique aspect of some 24-foot models is the addition of a rear bunk area, which increases sleeping capacity and provides flexibility for larger groups. This extra space makes it a fantastic choice for families with children or friends traveling together. The 24-foot Shasta combines the nostalgic aesthetic of classic RVs with the comfort and convenience of modern design, ensuring memorable adventures on the road. Key Features and Amenities of Shasta Motorhome Floor Plans Cozy Interior The 1995 Shasta Motorhome is loved for its snug feel inside. The friendly blend of inviting wood hues and appealing decor feel just like a second home. Soft fittings and enjoyable seats bump up the coziness, offering a wonderful spot to chill post-adventures. Every model’s sharp design adds to the livability, promising enjoyable living whether you’re camped or just taking a breather on the road. Compact Kitchen Shasta Motorhomes have cleverly designed galley-style kitchens. They’re made to make the most of small spaces. With necessary gear like a stovetop, sink, and fridge, you can cook basic meals while traveling. The design often has enough counter space for meal prep and spots to store your cooking tools. This makes cooking while you’re away quite handy. Whether you’re making an early breakfast before heading out for a hike or relaxing with a slow dinner, the Shasta motorhome kitchen can handle your cooking needs. Sleeping Accommodations Based on the floor plan, the 1995 Shasta Motorhome can fit anywhere from two to four people without any problems. You can use the space in a variety of ways thanks to the flexible sleeping arrangements, such as convertible dinettes and separate beds in the bedrooms. This flexibility is great for families or groups of friends traveling together because it makes sure that everyone has a good place to sleep. Having well-thought-out layouts makes it easy to relax after a busy day of adventures. Storage Space Even though they have a small design, the 1995 Shasta Motorhomes have many places to put stuff. Cabinets above your head, storage under the bed, and outside compartments make sure you have enough room for all your things. This means you can keep your living space tidy. Having a specific spot for your stuff is key for long trips. It makes staying organized easier. No matter if you’re prepping for a short vacation or a big road trip, the Shasta motorhome’s storage makes packing quick and finding your essentials simple. Plumbing and Electrical Systems Think of the 1995 Shasta Motorhome’s plumbing and electrical setups as your key to stress-free camping. The plumbing includes fresh water storage and gray and black water disposal. You also have functioning shower and toilet facilities. The electrical scheme gives you standard features such as 12V light sources and power ports; so, you can be comfortable and stay plugged in during your journey. Knowledge of these features is a must to keep your RV running well and make your adventures worry-free. Tips for Choosing the Right Shasta Motorhome Floor Plan Consider Your Group Size When selecting a floor plan for your 1995 Shasta Motorhome, the first consideration should be your group size. Assess how many people will be traveling with you and choose a model that comfortably accommodates everyone. If you’re traveling solo or as a couple, the compact 16-foot model may suffice. However, for families or larger groups, the 21-foot or 24-foot models provide the necessary space and sleeping arrangements. Think About Your Lifestyle The way you like to

Can You Use a Bissell Carpet Cleaner on Hard Floors? There are a lot of people who want to know if they can use their Bissell carpet cleaner on floors other than carpets to clean them. Carpets don’t need the same care as hard floors like tile, laminate, and hardwood. This blog post will talk about whether or not a Bissell carpet cleaner can be used on hard floors and how to do it correctly. Understanding Bissell Carpet Cleaners Bissell carpet cleaners are designed primarily for deep-cleaning carpets and rugs. These machines use a combination of water, cleaning solution, and powerful suction to remove dirt, stains, and allergens embedded in carpet fibers. They typically feature rotating brushes or bristles that agitate the carpet fibers to lift and extract debris. Because these carpet cleaners’ main job is to clean carpets and upholstery, they are designed and build to work best on soft surfaces. They work very well for what they’re meant to do, but depending on the model and the type of hard floor, they may not be suitable. Hard Floors vs. Carpets: Key Differences It’s important to know the difference between carpeted and hard surfaces before using a Bissell carpet cleaner on hard floors. The fibers of carpets trap dirt and stains, so they need a special way to be cleaned to get rid of them. On the other hand, hard floors don’t need to be moved around as much because they are smooth and don’t have as many pores. There are different ways to clean hard floors like tile, hardwood, and laminate. Cleaning these surfaces usually works best with a simple method like mopping and sweeping. There are some carpet cleaners that aren’t made to work well with hard floors, which can make them less effective and even damage the floor if they’re not used correctly. Can You Use a Bissell Carpet Cleaner on Hard Floors? The short answer is: it depends on the model. Some Bissell carpet cleaners are designed with attachments or settings that make them suitable for hard floors. For instance, models equipped with a “hard floor” mode or specific hard floor attachments can safely and effectively clean these surfaces. These features often include soft brushes or microfiber pads that prevent scratches and ensure proper cleaning. On the other hand, it might not be a good idea to use a carpet cleaner without these features on hard floors. Hard floors might get scratched or damaged by rotating brushes that are meant for carpets. Also, carpet cleaners that use a lot of water and cleaning products might not be good for hard floors because too much water can damage them by warping or staining them, especially wood or laminate floors. How to Use a Bissell Carpet Cleaner on Hard Floors? If your Bissell carpet cleaner has a hard floor setting or appropriate attachments, follow these steps to use it effectively on hard floors: Read the Manual: For specific instructions on how to use the cleaner on hard floors, look in the user manual. Please make sure that your model can clean hard floors. Prepare the Floor: To get rid of loose dirt and dust, sweep or vacuum the hard floor. This step keeps bigger things from scratching the surface while it’s being cleaned. Set the Cleaner: Adjust the cleaner to the hard floor setting if available. Attach the appropriate hard floor brush or pad if your model includes one. Use the Cleaner: Follow the manufacturer’s instructions for how to use the machine and how much hard floor cleaner solution to use. To get even coverage, move the cleaner in a planned way. Dry the Floor: Let the floor dry all the way through after cleaning it. Make sure there is no extra water left, especially on surfaces made of wood or laminate. By following these guidelines, you can make the most of your Bissell carpet cleaner on hard floors and achieve satisfactory results without risking damage. Alternatives to Using a Carpet Cleaner on Hard Floors If your Bissell carpet cleaner is not designed for hard floors, consider using alternatives specifically designed for these surfaces. Here are a few options: Hard Floor Cleaners: Bissell and other brands make hard floor cleaners that are made to work with different kinds of hard floors. Many of these cleaners have settings that can be changed, soft brushes, and water controls so they can be used on a variety of surfaces. Mops and Steam Cleaners: For regular cleaning, regular mops or steam cleaners can work very well. When it comes to hard floors, steam cleaners are great because they get the job done without using harsh chemicals. Vacuum Cleaners with Hard Floor Settings: Many vacuum cleaners come with settings or attachments specifically designed for hard floors. These options can effectively remove dust, dirt, and debris without the risks associated with using a carpet cleaner. Manual Cleaning: Simple methods of cleaning by hand, like using a microfiber cloth or the right floor cleaning solution, can work just as well for keeping hard floors in good shape. Conclusion In short, some Bissell carpet cleaners may not be able to clean hard floors, but others may be able to if they have the right attachments and settings. To keep your floors from getting damaged, it’s important to check the cleaner’s specs and do what the manufacturer says. If your carpet cleaner doesn’t work on hard floors, you might get better results with tools made just for that purpose. You can keep both your carpets and hard floors looking their best by knowing what your tools can do and picking the right way to clean them.
- admin
- 18 Mar 2025
Feeling You Might Have While Pacing the Floor: Why Do We Pace?

Feeling You Might Have While Pacing the Floor: Pacing is something that many of us do without realizing it. It is done by walking back and forth over and over again. It can be seen in a variety of settings, from private moments of reflection to work settings. People may think of pacing as a simple physical action, but it has a lot to do with how we feel and think. We can learn more about the complicated feelings that cause pacing by looking at its different parts. Anxiety and Restlessness One of the main reasons people pace is to deal with stress and restlessness. Pacing can be a physical way of showing that you are going through a lot of stress or emotional turmoil. Moving in the same way over and over again can help you deal with your stress by giving you a structured way to release your energy. The fight-or-flight response in our bodies is set off when we’re anxious. This can make our hearts beat faster and make us more alert. When you pace, you create a rhythm that may help calm your nervous system and control these physical responses. Just walking back and forth can help you forget about your bad thoughts for a little while, relieving some of your emotional stress. Furthermore, pacing can aid in controlling one’s breathing. The rhythmic nature of walking can synchronize with breathing patterns, helping to stabilize respiration and reduce feelings of panic. This connection between physical movement and breath regulation is why pacing is often observed during moments of intense anxiety. Deep Thought and Creativity It’s interesting that pacing isn’t just linked to anxiety; it can also help people think deeply and be creative. Pacing involves moving in a rhythmic way, which has been shown to stimulate brain activity and improve thinking. Pacing can help you get into a state of flow, which is a mental state where you are most creative and productive when you are working on difficult problems or creative projects. Pacing has been used by famous people in the past, like Winston Churchill and Albert Einstein, as a way to think. Churchill, for example, was known for always walking quickly when he was making plans and decisions. Similarly, Einstein’s pacing was said to have helped him understand complicated scientific theories and come up with new, ground-breaking ideas. The act of pacing can facilitate brainstorming and the development of new concepts by providing a physical outlet for mental energy. This allows individuals to move beyond conventional thought patterns and explore innovative solutions to problems. In this way, pacing can be seen as a catalyst for intellectual exploration and creative breakthroughs. Frustration and Impatience Pacing is another way that people show they are angry or impatient. People may walk back and forth as a way to physically show how unhappy they are when they are faced with problems or delays. One way to deal with feelings when things don’t seem to be going well or when goals seem too far away is to act in this way. The repetitive nature of pacing allows individuals to release pent-up frustration in a non-destructive manner. It provides an outlet for the excess energy that often accompanies feelings of impatience. Additionally, pacing may serve as a subconscious attempt to influence the outcome of a situation. The idea is that by moving physically, one might somehow affect the speed or direction of events, even though this is more a psychological comfort than a practical solution. In addition, pacing when you’re angry or upset can be a sign that you want to be in charge. When you can’t change things outside of your control, pacing can give you a sense of control and help you deal with the mental pain that comes with feeling helpless. Boredom and Restlessness Pacing can be a way to deal with boredom and restlessness. Pacing can be a way to break up the monotony when people are waiting around doing nothing or not being engaged. The motion that is done over and over again is a physical activity that keeps the body busy. People who pace in these situations usually need to get rid of extra energy or restlessness that they aren’t using in useful ways. Actively distracting yourself with this behavior can help you avoid getting bored. Additionally, it provides an easy way to stay engaged and focused even when outside stimuli are not present. Pacing can also become a normal response to times when you don’t do anything. Over time, people may start to associate pacing with being bored, making the behavior even more common as a way to pass the time. Habitual Behavior Pausing is something that some people do all the time as part of their daily lives. Pacing often becomes habitual when it is consistently linked to certain feelings or situations, like stress or anxiety. Over time, the brain makes a link between these feelings and pacing, which makes it a natural thing to do in similar situations. Sometimes it’s hard to break this bad habit. Because pacing is linked to emotional relief or distraction in the brain, the behavior keeps happening on its own. People who pace may know that they are doing it because they are stressed or anxious, but the habit is so strong that it is hard to break. Addressing habitual pacing often requires conscious effort and the development of alternative coping mechanisms. Mindfulness practices, relaxation techniques, and structured problem-solving approaches can provide more constructive ways to manage the emotions that drive pacing. By understanding and addressing the underlying triggers, individuals can work towards reducing the habitual aspect of this behavior. Conclusion Pacing is a multifaceted behavior that reflects a range of emotional states and psychological processes. While often associated with anxiety and restlessness, pacing can also facilitate deep thought, creativity, and frustration management. Understanding the different reasons behind pacing can provide valuable insights into our emotional and psychological needs. By recognizing the underlying feelings and circumstances
Categories
Archive Post
- November 2024 (2)
- October 2024 (4)
- September 2024 (14)
- August 2024 (9)
Recent Posts
- How Long Does It Take to Install 50 Sqft of Wood Floor? Timeline & Tips!
- Fort Lewis Housing Floor Plan Greenwood: A Historic and Welcoming Community!
- 3822 Blossom Terrace Erie PA Water Floor Plans: Hook Up Diagram, Layout and How to Turn Off Water
- Understanding the Price of a Wooden Electric Pole Replacement: Let’s Check All Factors!
- 40×60 Barndominium Floor Plans with Shop: A Versatile Living and Working Space
- Black House With Wood Accents Over the Garage Door: A Modern Aesthetic