- Erin Walker
- Comments 0
- 12 Jan 2025
Moisture Barrier Under Click and Lock Flooring on Wood Subfloor: It is very important to use a moisture barrier when installing click and lock flooring over a wood subfloor so that the system works well and lasts a long time. Barriers against moisture are very important for keeping moisture problems from happening that could damage the subfloor or the flooring itself. This blog talks about why moisture barriers are important, what can go wrong if you don’t use them, and how to make sure the installation goes smoothly.
What is a Moisture Barrier?
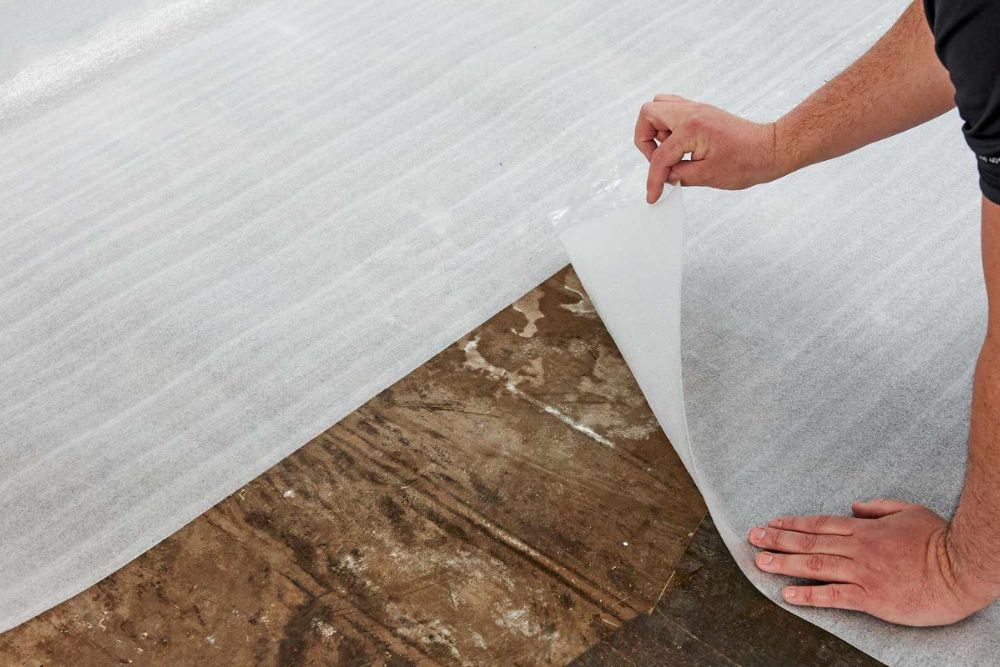
A moisture barrier is a layer of protection that keeps water from getting into the flooring system. Most of the time, this barrier is put between the click and lock flooring and the wood subfloor. The main job of this layer is to keep any moisture from the subfloor or the ground below from getting to the flooring, which would otherwise damage it.
Moisture barriers come in various forms, each suited to different flooring and environmental conditions. The most common types include:
- Plastic Sheeting: Polyethylene was used to make this material, which is flexible and strong. This material is commonly used because it is cheap and good at keeping water out. To make a continuous barrier, plastic sheeting is usually rolled out and overlapped at the seams. The edges are then taped shut.
- Foam Underlayments: Some foam underlayments come with an integrated moisture barrier. These products provide both cushioning and moisture protection, making them ideal for areas where comfort and insulation are important.
- Cork Underlayments: Cork is a natural material that can resist some water damage and block out noise very well. Cork underlayments can be useful in places where extra soundproofing is needed.
- Combination Underlayments: These are made with several layers, such as a layer that keeps moisture out and a layer that cushions. They protect you completely and make your feet feel better.
Each type of moisture barrier has its specific application and benefits, so choosing the right one depends on factors such as the level of moisture expected and the type of flooring being installed.
Types of Moisture Barriers
1. Plastic Sheeting
- Material: Made from polyethylene, available in various thicknesses (typically 6 mils or more for flooring).
- Installation: Rolled out flat, seams overlapping by a few inches, and taped shut to keep out moisture.
- Pros: Cost-effective, easy to install, provides a strong barrier against moisture.
2. Foam Underlayments
- Material: Foam with a built-in moisture-resistant layer.
- Installation: Lay out with seams, but because the barrier is built in, it’s usually not as important to tape.
- Pros: It’s good for general residential use because it cushions and blocks out noise.
3. Cork Underlayments
- Material: Natural cork is often mixed with other materials to make them more resistant to water.
- Installation: Similar to foam underlayments, can be glued or floated into place.
- Pros: Natural material with good insulation properties, reduces sound transmission.
4. Combination Underlayments
- Material: Layers of moisture-resistant materials combined with cushioning.
- Installation: Lay out with care, making sure seams are in the right places and that they are taped if needed.
- Pros: Provides complete protection and comfort, and can be used on a variety of flooring types.
Why Moisture Barriers Are Essential?
Protecting the Subfloor
Wood subfloors can easily soak up moisture, which is a problem. Why? Because wood can pull in water from its surroundings. If we don’t keep a check, problems can pile up. The subfloor can change shape, get bigger, or even decay from too much moisture. That’s not all! It can mess with the overall strength of the subfloor and result in a bumpy surface. This makes it difficult to lay down the flooring on top.
A moisture barrier’s main job is to act like a raincoat for the wood. It keeps water, from the ground or elsewhere, from messing up the subfloor. This is really important for click and lock flooring. If the subfloor isn’t steady and even, problems can pop up. Like gaps in the planks, noisy creaks when you walk, and worst case, the floor might start to bulge or buckle as the years roll by.
Additionally, protecting the subfloor with a moisture barrier helps prevent potential long-term damage that could be costly to repair. By addressing moisture concerns upfront, you ensure that the flooring installation remains in good condition and performs as expected over its lifespan.
Preventing Mold and Mildew Growth
When water sneaks between the subfloor and flooring, a damp, dark space springs up. This is a perfect stage for mold and mildew to perform their grim dance. They love wet, shadowy areas and can turn into a nightmare very fast if ignored. Mold and mildew on the scene are not just bad actors stealing the beauty of the place but also villains posing health threats. They can trigger breathing troubles, allergies, and more health woes to those within the building.
Moisture barriers are key to halting mold and mildew. They stop moisture build-up, reducing the chance for mold-friendly environments. This is super important in humid places or where moisture could easily sneak in, like basements or ground floors.
Additionally, preventing mold growth helps maintain a clean and healthy living environment. It also protects the aesthetic and structural quality of the flooring, reducing the need for costly cleaning or remediation efforts in the future.
Maintaining Flooring Warranty
Most makers of floor materials stipulate specific installation guidelines. This is to make sure their warranty stays intact. A frequently mentioned requirement is a moisture barrier. Neglecting to use such a barrier as directed might result in moisture-related problems not being acknowledged under the warranty. This situation might put you in a spot where you’ll have to bear the cost of repairs or replacements, which would normally be covered.
It is important to follow the manufacturer’s instructions for installing a moisture barrier if you want to keep the warranty valid. As part of this, you must pick the right type of barrier for your flooring and make sure it is installed correctly. By following these tips, you can be sure that you are covered in case of problems and that your flooring investment is safe.
Problems Caused by Lack of Moisture Barriers
Buckling and Warping
Not having a moisture barrier lets dampness creep from the subfloor into the floor. This could make the flooring swell or shrink with shifts in moisture and warmth, causing bumps or twist. Bumps mean the floorboards rise or detach from the subfloor, while twist makes them bend. These troubles can form an unstable, lumpy surface.
It’s not pleasant to walk on and may harm furniture or other stuff on it. Fixing or changing the twisted or bumped flooring is expensive and takes a lot of time, especially if the moisture problem hasn’t been dealt with. To steer clear of these issues, it’s critical to install a moisture barrier that stops dampness from getting to the floor. This keeps the environment stable and stops the floor from reacting to moisture level changes.
Adhesive Failure
Glue-down floors stick to the subfloor using adhesive. But, too much dampness can mess up the adhesive, causing problems. The floor could start to lift or come loose. This doesn’t look good and could lead to more damage if it’s not fixed quickly. A layer to stop dampness, a so-called moisture barrier, can help. It stops dampness from getting to the adhesive, keeps it working right, and makes sure the floor stays put. Picking the right kind of barrier and putting it in right can stop these sticky problems.
Surface Staining
Sometimes stains show up on the floor’s surface because of water that seeps through the subfloor. It can be hard to get rid of these stains, which are often caused by water damage, mold, or mildew. Stains on the surface of the floor not only make it look bad, but they can also be a sign of moisture problems that need to be fixed.
Using a moisture barrier helps prevent staining by stopping moisture from reaching the flooring surface. This preserves the appearance of the flooring and reduces the risk of long-term damage. Regular inspections and maintenance can also help identify and address any potential issues before they lead to noticeable staining.
Solutions for Installing Moisture Barriers
Proper Subfloor Preparation
Here’s what you do before putting a moisture barrier in place. First, your subfloor needs to be ready. That means it should be clean, dry, and even. Get rid of dust, fragments, or old, sticky bits. These can mess up the sticking of the moisture barrier and the floor above. You’ve also got to sort out any wet problems in the subfloor. This might mean fixing leaks, letting some air in, or using a tool to measure the wetness. By making sure the subfloor is dry and moisture-free, your moisture barrier can do its job well.
A level subfloor is also crucial for a successful installation. Uneven surfaces can cause problems with the moisture barrier and the flooring, leading to issues such as gaps or buckling. Use a leveling compound if necessary to create a smooth, even surface before laying down the moisture barrier.
Choosing the Right Moisture Barrier
Selecting the appropriate moisture barrier for your specific installation is key to ensuring effective protection. Consider the following factors when choosing a moisture barrier:
- Type of Flooring: It’s possible that different types of flooring need different kinds of moisture barriers. Check the manufacturer’s instructions to make sure they are compatible.
- Level of Moisture Exposure: Choose a high-quality moisture barrier with extra thickness or special properties for places where there is a lot of humidity or where moisture problems could happen.
- Installation Environment: Consider the environment in which the flooring will be installed. For example, basements or ground-level floors may require more robust moisture barriers compared to upper floors.
Make sure to select a moisture barrier that meets the requirements for your particular installation and provides adequate protection against moisture.
Installation Guidelines
Proper installation of the moisture barrier is crucial for its effectiveness. Follow these guidelines to ensure a successful installation:
- Lay Out the Barrier: Make sure the moisture barrier is flat and smooth before rolling it out over the subfloor. Do not make any folds or wrinkles that could affect how well the barrier works.
- Overlap Seams: When laying out plastic sheeting or similar barriers, overlap the seams by several inches to ensure complete coverage. Seal the seams with moisture-resistant tape to create a continuous barrier.
- Extend Up the Walls: If you need to, you can make a continuous protective layer by extending the moisture barrier up the walls a little. This might help keep water from getting under the barrier at the edges.
- Follow Manufacturer’s Instructions: Always follow the manufacturer’s instructions for installation to ensure that the moisture barrier is used correctly and effectively.
Regular Inspections
Once the moisture barrier and floor are in place, regular checks are a must. We’re looking for signs of moisture problems or damage here. Spot buckling, warping, or stains on the surface? Act instantly! These checks help find problems while they’re still small. Spot a problem? Track down where the moisture’s coming from and cut it off. Watching your floor and moisture barrier keeps your floor looking and doing its best for a long time.
Conclusion
The use of a moisture barrier under click and lock flooring on a wood subfloor is essential for protecting your investment and ensuring a successful installation. By understanding the importance of moisture barriers, the problems that can arise without them, and the solutions for proper installation, you can safeguard your flooring and maintain a beautiful, functional surface for years to come. Proper planning, choice of materials, and adherence to installation guidelines are key to achieving a durable and long-lasting flooring system.